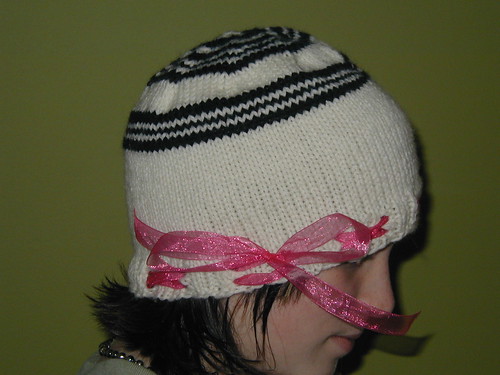
I finished the hat!!!! I'm really happy with the 2nd try at it too. And though it looks really cute on my daughter Keelei (it does, doesn't it?) - I'm keeping it for myself;) I wore it all yesterday and got tons of compliments on it. Even several strangers came up to tell me what a cute hat it is. Anyways, like I said in a previous post - I did this up for part of a group I belong to on Ravelry, and I promised to post the finished pattern for all who wanted a cute ribbon hat of their own, so here goes:
A Perfect Holiday Ribbon Hat
Yarn: Karabella Aurora 8 (or another similar yarn)
Needles: Size 8
Cast on 99 stitches using the backward loop cast-on (or your favorite stretchy cast on)
Rows 1, 2, 4, 5, 6, 7, 8, 9, 11, 12: Work in a K2, P1 rib pattern placing a marker and joining in the round on the first row.
Rows 3 & 10: *K2, P1, y/o, K2tog, P1* repeat from star 15 more times, end in a K2, P1. (this will give you a wider space where the beginning and end of the round join - this is where you will have the "tie" in your bow on the completed hat)
Row 13: Purl Across to marker
Row 14: Knit around, continue in this manner until piece measures 5".
Now we start to decrease:
Row 1 *K9, K2tog* repeat until marker
Row 2 Knit around
Row 3 *K8, K2tog* repeat until marker
Row4 Knit around
Row 5 *K7, K2tog* repeat until marker
Row 6 Knit around
Row 7 *K6, K2tog* repeat until marker
Row 8 Knit around
Row 9 *K5, K2tog* repeat until marker
Row 10 Knit around
Row 11 *K4, K2tog* repeat until marker
Row 12 Knit around
Row 13 *K3, K2tog* repeat until marker
Row 14 Knit around
Row 15 *K2, K2tog* repeat until marker
Row 16 Knit around
Row 17 *K1, K2tog* repeat until marker
Row 18 *K2tog* repeat until marker
9 stitches remain, cut yarn leaving about 8" and weave thru remaining stitches pulling tight. Tie off and weave in all ends.
You will be left with holes towards the upper and lower ridges of the ribbing, take a nice soft flexible ribbon and starting at the widest point (near where your marker was on the ribbing you should have 2 rows of knit and 3 rows of purl between holes vs. the 1 row of knit between them around the rest of the hat - hope that makes sense). Weave your ribbon in and out of these holes making an "X" pattern in and out. When you get to the final hole, before tying off, try the hat on and adjust the ribbon as needed so that it will comfortably fit your head. I tyed mine while on my head and haven't had to readjust since.
Hope you enjoy this pattern - it is the first that I've ever written to share, so if you come across any errors in it or have any questions, please let me know.
Thanks so much!!!


